

How To Assemble a Fixed Shade Cord Hardware Kit - 1/8 IPS
Brian ObernesserVideo walkthrough of the fixed shade assembly
Ready-Made Hardware Kits for Fixed Shade Assemblies
At Color Cord Company, we strive to make custom lighting accessible to all kinds of creators, whether you're a DIY beginner, a ceramicist, a glassblower launching a lighting line, or just looking for inspiration for your next project.
Our Colorado-made shade-ready assemblies are UL-rated and designed to work with a common Euro or 1 5/8-inch shade opening, but we also offer solutions for other shade styles. For the full rundown of shade opening options, check out our Shade Compatibility blog. Buying a light we've already built is the easy button, but we also sell hardware kits, shades, bulbs, and individual components so you can assemble something uniquely yours.
For smaller shade openings, like 7/16 or 1/2 inch, you'll need to build the fixture around the shade itself rather than dropping it onto a standard socket. This is also the route to take if you already have some parts on hand, like a cloth-covered cord, canopy, or socket, in which case our fixed shade cord hardware kit alone might be all you need to finish the job.
Use the parts list below to order everything for this assembly. We've split it into two lists, one for hardwired and one for plug-in, so you only need to look at the one that matches your project. And be sure to watch the video tutorial above to see what's included and how it all comes together.
In This Post
Hardware Kit Contents

Our Fixed Shade Cord Hardware Kit includes a female metal cord grip / strain relief, available in six metal finishes, built to secure a 1/8 IPS slip style shade to our cloth covered wire. We also sell a tubing-oriented version separately if that fits your shade better.
What's in the Kit
(listed here in case you need to purchase any piece separately)
- 1x 1in 1/8 IPS All Thread Nipple
- 1x 1/8 IPS Metal Washer
- 2x 1/8 IPS Silicone Washer
- 2x 1/8 IPS Knurled Nut
- 1x 1/8 IPS Female Barrel Cord Grip
Additional Lamp Parts
The hardware kit above only covers the nuts and bolts, literally. To finish the fixture, you'll also need a cord, shade, socket, and a way to power it, plus whichever parts list below matches your build.
If You're Going Hardwire
- DIY Cloth Covered Wire
- 1/8 IPS Shade, or provide your own
- Socket of Your Choice (our video shows Basic Ivory e26)
- Ceiling Canopy
- Socket Cover (optional, shown in Rounded style in the video)
- Color Cord 3000 (optional)
If You're Going Plug-In
- Power Cord Whip
- 1/8 IPS Shade, or provide your own
- Socket of Your Choice
- Socket Cover (optional)
- Color Cord 3000 (optional)
Tools for Installation

- Wire stripping tool
- Phillips head screwdriver
- Flat head screwdriver
- Needle nose pliers
- Masking tape
Watch the video above alongside the steps below, we've also included still photos for every step so you can double check your progress as you go.
Prepping the Cord
- Strip the cord.Strip your cord for several inches.
- Gather your small parts.Set out your 1/8 IPS shade and all of the small 1/8 IPS hardware pieces so they're within reach.
- Feed on the cord grip.Slide the female barrel cord grip onto the unstripped section of cord that will stay OUTSIDE your shade.
- Follow with the small parts.Feed on one knurled nut, the metal washer, and one silicone washer, in that order, right behind the cord grip.
Quick reference, outside top of the shade: Cord Grip → Knurled Nut → Metal Washer → Silicone Washer.


Threading the Shade
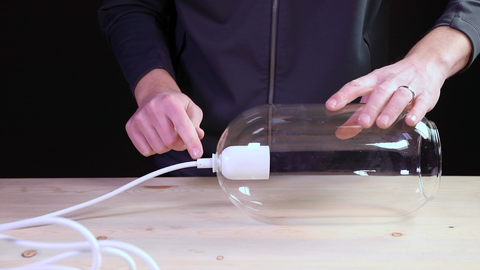
- Feed the cord through the shade.Feed the exposed end of your cloth covered wire or power whip through the top opening of your shade.
- Add the inside hardware.Slide on another silicone washer and knurled nut on the INSIDE TOP of the shade.


Prepping for the Socket
- Thread the nipple.Thread the 1" All Thread Nipple into the top of the socket cap.
- Add the socket cover.Slide your socket cover over the nipple and socket.
- Lock it down.Thread the knurled nut onto the all thread nipple as tightly as possible, this keeps the socket from spinning when you twist in a bulb later.
- Add the washer.Feed the silicone washer onto the nipple, flush against the knurled nut.
- Feed it into the shade.Feed the cord back through the top opening of the shade so the all thread nipple passes through the top and the silicone washer sits flush against the INSIDE TOP of the shade.


Installing the Socket
- Add the washer.Slide the top silicone washer down over the all thread nipple.
- Add the metal washer.Follow it with the metal washer.
- Thread on the final pieces.Thread on the other knurled nut, then the female metal barrel cord grip, onto the all thread nipple.
- Tighten it down.Tighten the set screw on the cord grip to lock everything in place.


Hang It Up & Enjoy
Step back and admire your work, you built that. Hang your fixture, add a bulb, and take in the payoff for all that threading and tightening.


Shop This Post
Fixed Shade Cord Hardware Kit → DIY Cloth Covered Wire → 1/8 IPS Glass Pill Shade → Ceiling Canopy (Hardwire) → Power Cord Whip (Plug-In) →As you work, check each stage against the photos above, it really is that easy once you see it laid out step by step. If you have any concerns before you begin, our team is always happy to help, explore our other tutorials, or reach out to us online with questions about parts, tools, or your specific project.
Be sure to tag us in your photos of your assembled 1/8 IPS Fixed Shade Cord Hardware Kit!


