
Custom Workstation Lights!
Are you looking to personalize your space with custom workstation lighting? Well, Color Cord Company is excited to be able to help with a step-by-step tutorial on how to create a trio of custom stacked wood light fixtures. Follow along as we guide you throughout the process, providing a comprehensive parts list, written instructions, and video examples of our work!
Why This Fixture?
We chose to create this custom workstation tutorial to improve our “You Choose, We Build” initiative. This work station lighting fixture was installed over our production area, which is where we hand-assemble all our custom orders to your specifications. We needed a well-lit space for better building and quality manufacturing, so these fixtures had to deliver a lot of power for task lighting!
The stacked wood design we chose is a simple and affordable way to create an impactful fixture out of easily found and affordable materials.
Three-Steps to Completion
There are just three steps to create this custom workstation light fixture! Check them out:

Step 1.
Start off by cutting 12" lengths of 2" x 2" wood into 17 pieces. Repeat this step for however many pendant fixtures you plan on making for your custom workstation.
You can opt for any type of wood to personalize the color scheme. You can also modify the wood slabs to design taller or shorter crates, based on your preference.

Step 2.
Next, stack the wood pieces to create your square pendant shape. Use a strong wood glue to adhere all of the pieces together. Finish this assembly by adding uniform weights and pressure weights to the top of the assembly.
Once the weights are in place, align and straighten all the pieces. Let the frames sit overnight for the glue to completely dry.

Step 3.
The final step of this process is to sand the fixture. Start your sanding with a low grit sandpaper to remove any excess glue and smooth out defects. Then work your way up to a fine-grit sandpaper to get a nice smooth finish.
After sanding, you can leave the fixture in a raw wood finish, or take this opportunity to stain it in any color.
Pendant Assembly
Once your crate shade is ready, you can bring the bulb and pendant parts together. Make sure you shop a complete pendant kit with all the parts you need, or buy each piece separately for a completely custom workstation setup.

 |
Assembly DiagramTo the left is a simple diagram showing the individual pieces we used to assemble the fittings around the wood pieces. All these are available in the parts section of our website!
|
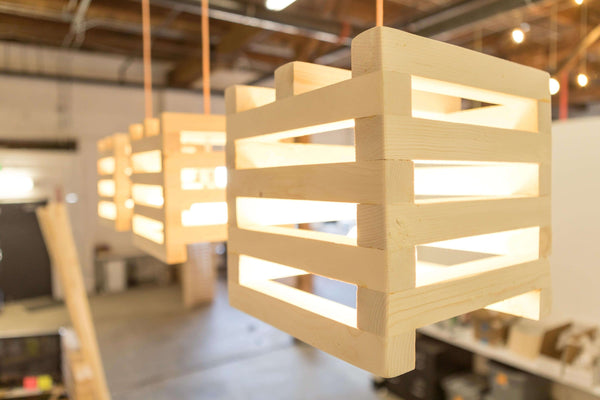
The Finished Product
This project takes a little bit of time and effort, but the final product turned out great for a fraction of the cost when compared to three off-the-shelf-type fixtures. It’s also such a unique creation that can really elevate your space by adding personal individuality.
We like to think of ourselves as our own special snowflakes, so custom creations are a true passion. Let us help you design from scratch when you find inspiration on our blog or explore our customization station today!